Welcome to the ultimate homemade treat with a nostalgic twist. Remember the school cafeteria’s delicious smell? Those chewy peanut butter cookie bars are a beloved treat that always makes everyone happy. Now, I’ll show you how to make this classic. With simple ingredients and a few steps, you can bake a perfect batch. These peanut butter cookie bars are great for parties or just treating yourself.
Jump to RecipeKey Takeaways
- Cherish the sweetness of nostalgia with this peanut butter cookie bars recipe.
- Indulge in the chewy, salty-sweet goodness of homemade peanut butter lunch lady cookie bars.
- Enjoy the simplicity of a dessert that’s perfect for gatherings or a personal treat.
- Relive cherished childhood memories in every bite of these delightful cookie bars.
- Discover the joy of baking with a recipe that’s both easy and rewarding.
Introduction to Peanut Butter Lunch Lady Cookie Bars
Imagine walking into a school cafeteria. You’re hit with the sweet smell of peanut butter lunch lady cookie bars. This treat brings back nostalgic memories. This treat combines the rich flavor of peanut butter dessert with the comforting texture of homemade cookie bars. They’re delicious and bring back memories.
These cookie bars stand out for a few reasons. They are soft, have creamy peanut butter, and are finished with chocolate frosting. Each bite brings back fun school memories. They are loved by kids and adults who want a taste of yesterday.
| Preparation Details | Ingredients Needed | Cooking Instructions |
|---|---|---|
| Total Prep Time: 20 minutes | Butter, Sugars, Peanut Butter | Bake at 400°F for 20 minutes |
| Cook Time: 20 minutes | Eggs, Flour, Oats | Let cool before frosting |
| Total Recipe Time: 40 minutes | Milk, Vanilla, Baking Soda | Cut into squares after frosting |
This dessert is perfect for any event. This dessert not only fulfills your sweet craving but also evokes a sense of nostalgia. Peanut butter lunch lady cookie bars are great for parties, family events, or as a personal treat. The recipe is easy, needs common ingredients, and always tastes amazing!

The Heartwarming History of School Cafeteria Treats
Walking into the school cafeteria feels like finding a treasure of nostalgic school treats. Each bite takes you back to fun childhood memories. Beyond the arranged lunch trays and lively space, cafeterias are a place for meeting and sharing cultures. The simple cafeteria delicacies we love, like peanut butter cookies, came from need and clever thinking.
In the early 1900s, cities grew fast and customs changed. This affected how schools served food. The National School Lunch Program started, focusing on healthy meals and the eating experience. It’s been key to our schools ever since.
Cafeterias let cooks be creative. Through the years, they’ve made simple food into comforting dishes. Today, 56% of students in the lunch program pick these meals daily, showing their value.
Every day, students look forward to lunch. For example, one day, 378 out of 1,103 students enjoyed meals from Clark’s cafeteria. They had 30 different dishes to pick from that month. Despite new diets and rules, some meals remain loved. They link us to our past.
Let’s look at how cafeterias have shaped our tastes:
| Date/Event | Impact on School Meals |
|---|---|
| 1900s-1910s | Introduction of sanitary, affordable food and meals made line by line. |
| 1902 & 1905 | First, automats and Italian pizzerias started, adding variety to school food. |
| 1910s | With more food companies, snacks like Oreos and animal crackers became popular. |
For ages, school meals have satisfied our hunger and warmed our hearts. They show how American food has changed but remain underappreciated. To many, these dishes mean shared joy, created and savored together.
Essential Ingredients for Your Cookie Bars
Every delicious batch of peanut butter cookie bars starts with a list of special ingredients. These are more than just parts of a recipe; they’re what make your baking journey memorable. Let’s explore these vital components that ensure your cookie bars are both creamy and flavorful.
Choosing the Right Peanut Butter
Peanut butter is crucial for your cookie bars. It affects both their texture and taste. I suggest creamy peanut butter for a smooth mix and a bold flavor. Good quality, fresh peanut butter is key for that beloved taste we all remember.
The Role of Flour and Sugar
Flour and sugar are foundational. I use all-purpose flour and packed brown sugar for a perfect texture and taste. This combination gives the cookie bars a chewy yet soft feel, exactly what you want.
Wet Ingredients: Eggs and Milk
Eggs and milk make your cookie bars rich and moist. Egg whites lighten the texture. Milk brings everything together for perfect baking results.
### Peanut Butter Cookie Bars Recipe: Quick Facts
| Category | Detail |
|---|---|
| Yield | 25 bars |
| Prep Time | 10 minutes |
| Cook Time | 25 minutes |
| Total Time | 35 minutes |
| Baking Temperature | 350ºF |
| Mixing Duration for Batter | 1 minute |
| Mixing Duration for Glaze | Until smooth |
| Recommended Storage | Airtight container in the refrigerator |
| Freezing Duration | 3 to 4 months |
Knowing about the right ingredients for Peanut Butter Lunch Lady Cookie Bars is vital. Each one plays an important role, making the bars not just tasty but also nostalgic. They bring back sweet memories with their creamy texture and rich flavor.
Step-by-Step Guide to Making Peanut Butter Cookie Bars
Welcome, fellow homemade dessert lovers! I’m excited to show you how to make peanut butter cookie bars. These easy steps will give you tasty treats in no time.
Let’s start by heating our oven to the perfect temperature—350°F (177°C) is ideal. Then, find your 17 x 12.25-inch jelly roll pan. This ensures our cookie bars bake evenly.
- Begin by melting 16 tablespoons of unsalted butter. Then mix it with 3/4 cup of granulated sugar and 1-1/4 cup of firmly packed brown sugar. This mix makes our base sweet and rich.
- Add in 2 large eggs and 1-1/2 teaspoons of vanilla extract. This gives a creamy texture and a vanilla flavor.
- Now, add 2 cups of all-purpose flour, 1 teaspoon of baking soda, and 1 teaspoon of salt. This forms the structured base for our bars.
- Warm 1-1/2 cups of creamy peanut butter in the microwave for about 30 seconds. Blend it into your base mix smoothly.
- Evenly spread the batter in the pan, touching all corners. Bake for 15-17 minutes. They’re done when the edges slightly pull away from the pan and the center is set.
While the bars cool, let’s make some frosting. Melt 8 tablespoons of unsalted butter. Mix it with 1/4 cup of cocoa powder, 3 cups of powdered sugar, and 1/4 cup of whole milk. The result should be creamy and easy to spread.
After cooling the bars and applying the frosting, let them set for about 20 minutes. Then, cut into squares, serve, and enjoy their disappearance! These bars are perfect for homemade desserts, gifts, or party treats.
Why Peanut Butter Lunch Lady Cookie Bars are a Classic
I’ve always loved classic peanut butter snacks. Yet, Peanut Butter Lunch Lady Cookie Bars hold a special place. These cookies are more than just tasty. They remind us of the good old days in school cafeterias.
What makes them so special? It’s their unique taste. They perfectly mix salty and sweet. Their texture is also just right, not too chewy or too soft, making them a favorite for many.
Their popularity goes beyond just flavor. With recipes like the Easy Peanut Butter Lunch Lady Cookie Bars, anyone can make them. They’re perfect for big events, satisfying many with their large batch size.
They’re also adaptable for healthier options. Bakers can reduce sugar or use gluten-free flour, making them fit different diets.
Despite being a sweet treat, these bars can be a good choice for some diets. Look at their nutritional value:
| Nutrient | Amount per Serving |
|---|---|
| Calories | 392 kcal |
| Total Fat | 23 g |
| Saturated Fat | 10 g |
| Carbohydrates | 42 g |
| Dietary Fiber | 2 g |
| Protein | 7 g |
| Sodium | 321 mg |
| Sugars | 28 g |
These bars are not just tasty, they can also boost your energy. They’re great for any time, like school events or a family get-together. Enjoying Peanut Butter Lunch Lady Cookie Bars is like taking a delicious trip back in time.
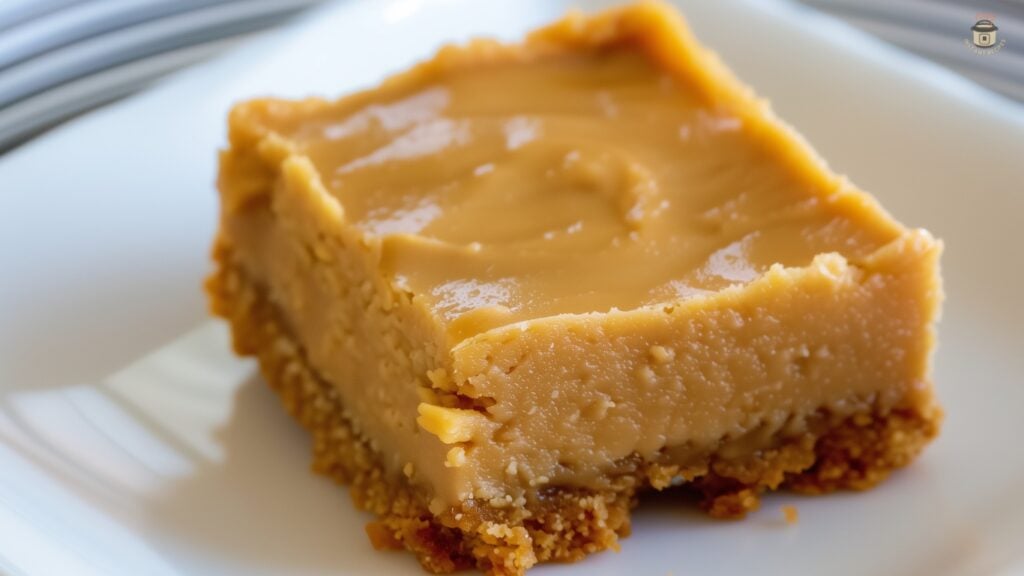
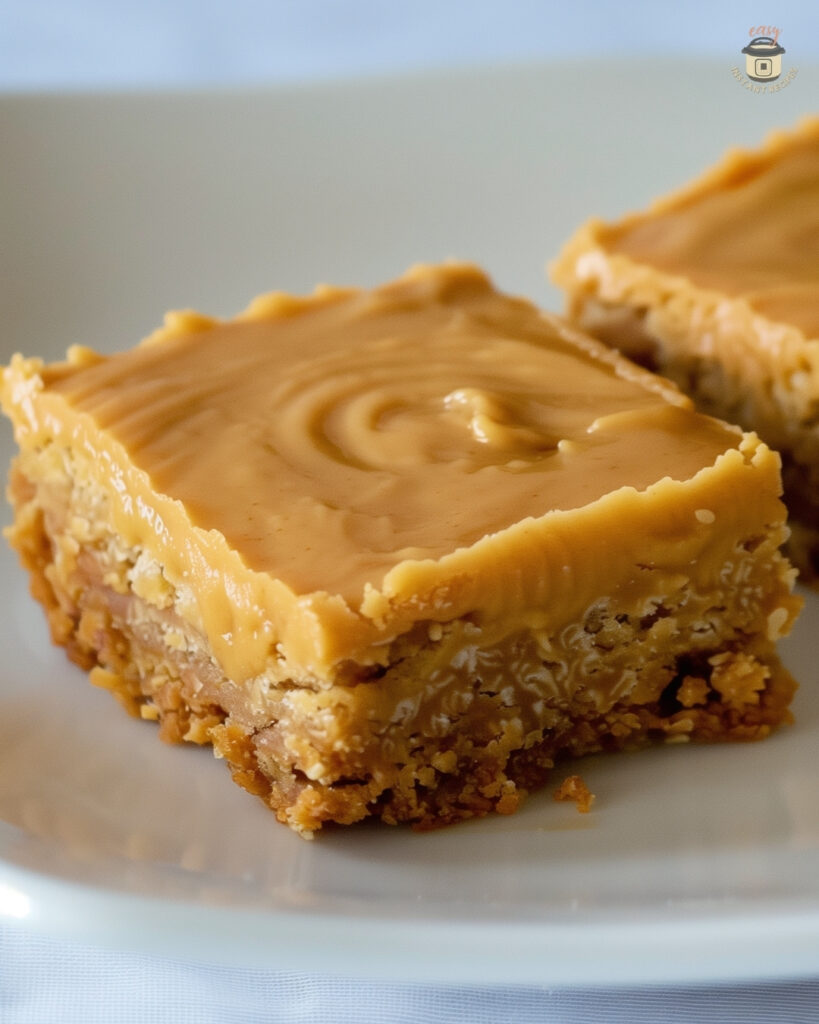
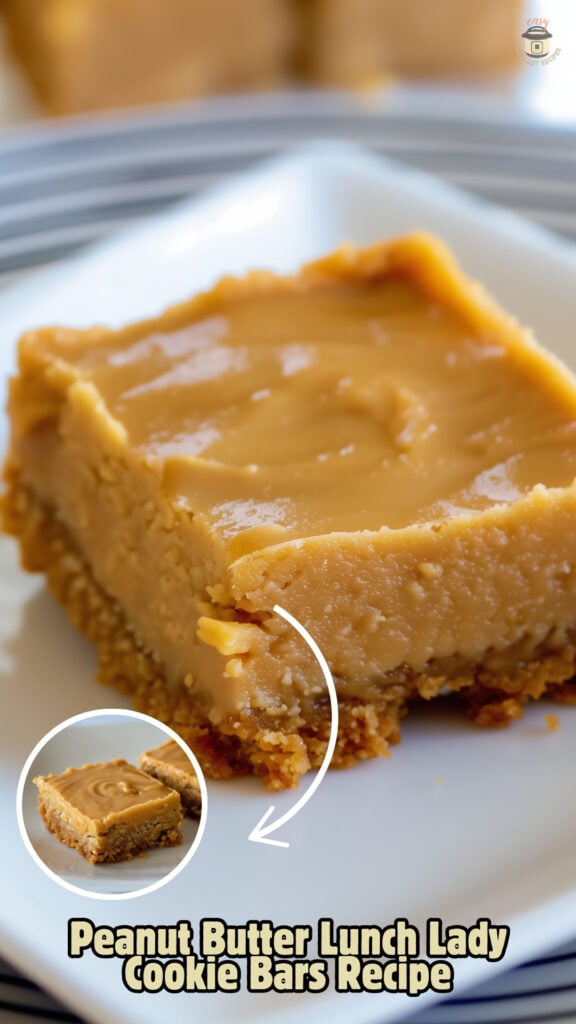
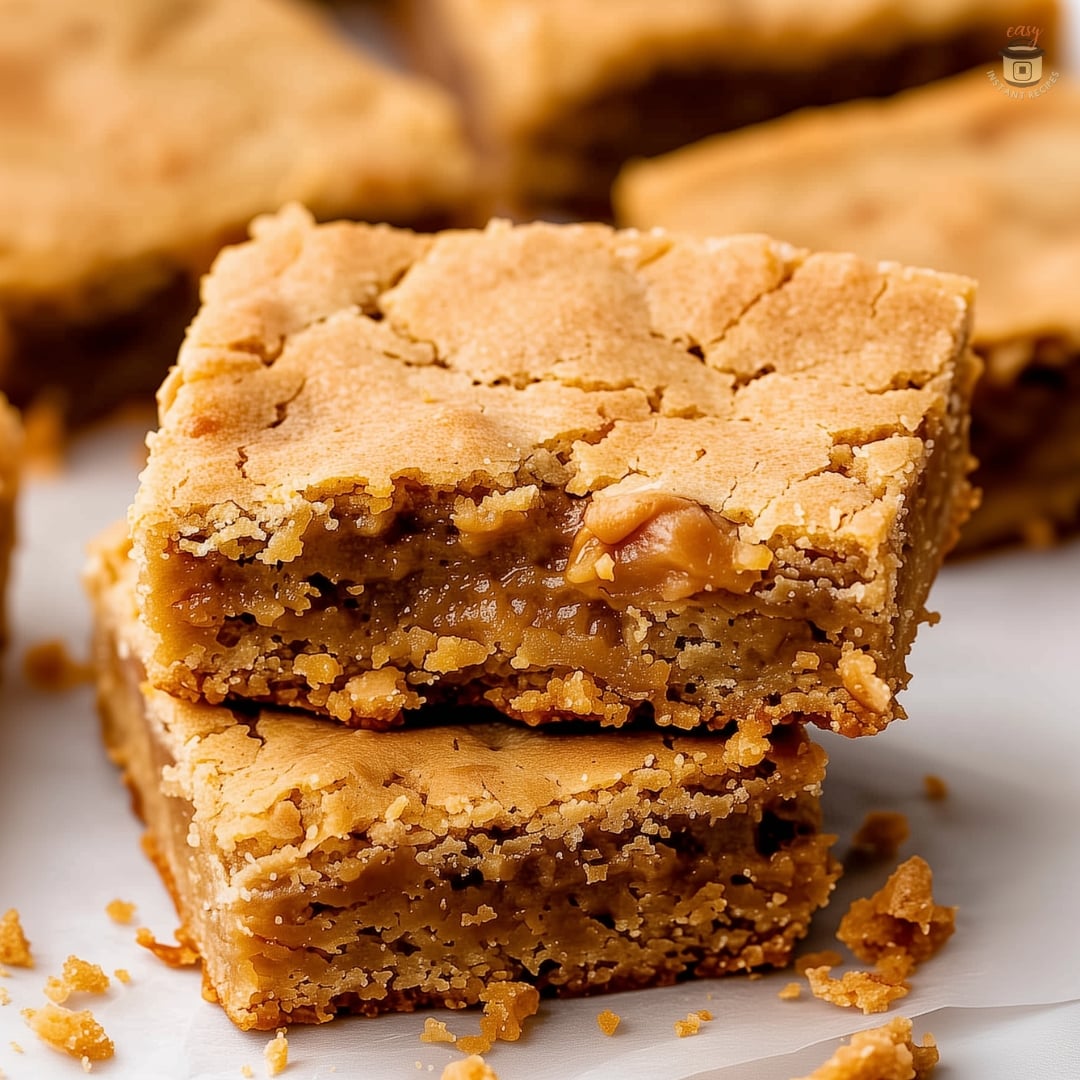
Peanut Butter Lunch Lady Cookie Bars Recipe
Today, let’s dive into a yummy treat from our school days: peanut butter lunch lady cookie bars. This recipe brings back happy lunch break memories with its gooey texture and sweet taste. The mix of peanut butter’s richness with a chewy cookie bar’s simplicity makes it stand out. Plus, these bars are super easy to make, perfect for anyone’s collection of simple dessert recipes.
First up, here’s what you’ll need to make these amazing bars:
- Total number of bars produced: 25 bars
- Baking pan dimensions: 9×13 inches (approx. 23×33 cm)
- Preheat oven temperature: 350°F (180°C) or 160°C fan oven
- Baking time: 25 minutes
For the base and topping, the ingredients are simple but create a moist and chewy texture. Get your bowl ready to start the dough:
- Unsalted butter: ½ cup, softened
- Creamy peanut butter: ⅓ and ½ cup for the glaze
- Packed brown sugar: 3 cups
- Large egg whites: 5
- Vanilla extract: 1 tablespoon
- Canned applesauce: ½ cup
- All-purpose flour: 3 cups
- Baking powder: 1 tablespoon
- Salt: 1 teaspoon
For the yummy glaze on top, you’ll mix:
- Powdered sugar: 2 cups
- Milk: ½ cup
- Corn syrup: 3 tablespoons
Each bar is packed with energy, offering about 440 calories and 9 grams of protein. They fit into a balanced diet, all while bringing back sweet memories.
Mixing the ingredients takes about 10 minutes, and baking takes 25 minutes. So, it’s only 35 minutes from start to finish. Once they’re baked, cool them in the fridge for at least an hour before cutting. This makes them set well and easier to serve.
These chewy cookie bars are not just easy to make but also keep well. Store them in an airtight container in the fridge for up to 5 days or freeze for 3 to 4 months. They stay deliciously delectable.
Wanting to relive those school cafeteria moments or just make a tasty treat at home? This peanut butter lunch lady cookie bars recipe is your ticket to delicious nostalgia. Have fun baking and eating these delightful treats!
Customizing Your Peanut Butter Cookie Bars
When customizing cookie bars, I aim to make everyone want more. The classic peanut butter cookie bar is a great starting point. Adding chocolate peanut butter bars is one of the best twists. This simple step combines the salty peanut butter with sweet chocolate. Just melt 12 oz. of chocolate chips and spread them over the bars before they cool. This creates a delicious contrast that makes the snack even better.
For fans of alternative nut butter treats, there’s a lot to try. You can use almond butter, cashew butter, or sunflower seed butter instead of peanut butter. These alternatives cater to different diets and add unique tastes and nutrition. Switching to almond or cashew butter offers an exciting change.
The great thing about customizing your peanut butter cookie bars is the variety of add-ins you can use. You might add quick-cooking oats for texture or drizzle honey for sweetness. It’s important to keep a good balance of textures and flavors with each new addition.
Making these bars is also pretty easy. They only take 40 minutes from start to finish. You can enjoy these tasty bars after just 15 minutes of cooling. They’re perfect for quick snacks and can stay fresh for up to 3 days.
So, why not add a personal touch to your next batch? Whether you crave chocolate peanut butter bars or want to try alternative nut butter treats, there’s so much you can do. Let’s get creative in the kitchen!
Tips for Perfect Peanut Butter Lunch Lady Cookie Bars Every Time
To get the perfect cookie bars, particularly peanut butter ones like the lunch ladies used to make, follow these tips. Stick to the ingredients list for the right flavor and texture. Avoid baking too long to prevent dryness and keep the peanut butter taste rich.
Use a 17 x 12.25-inch jelly roll pan. Bake at 350 degrees F for 15-17 minutes. This timing is key for that chewy edge we all love. The bars keep cooking a bit after coming out of the oven. So, baking them less is better.
Eat these bars within 2-3 days to enjoy them the most. They stay good at room temperature for up to 5-7 days. If you need to store them longer, freeze them. They can last in the freezer for up to 3 months if wrapped right to avoid freezer burn.
Spread the frosting evenly while the bars are warm. This way, the frosting covers every bit, making a smooth topping. It tastes great with the peanut butter base.
These tips help keep the classic taste and texture of the peanut butter lunch lady cookie bars. They ensure every batch you make is truly wonderful. Happy baking!
The Magic of Sheet Pan Cookies
Imagine the smell of fresh cookies filling your home. It invites everyone to the kitchen. Sheet pan cookies bring joy and highlight convenient baking and perfect cookie bar texture.
Why go for sheet pan cooking? First, think of the convenience. Everything goes on one pan, so clean-up is easier. Plus, you have more time to spend with loved ones. Baking on a sheet pan lets you make big batches all at once. This makes sheet pan cookies perfect for group events.
Why Sheet Pan Cookies are Convenient and Delicious
Making a batch of sheet pan cookies is simple. They’re easy to mix, spread, and bake. The result? Always tasty. This method is convenient baking at its finest. There’s no need for rolling individual cookie balls. Just spread the dough, bake, and enjoy. It’s sweet, easy, and direct.
Getting the Perfect Cookie Bar Texture
That chewy, yet tender cookie bar bite is something everyone loves. Using a sheet pan makes getting the perfect cookie bar texture easy. The oven’s even heat cooks everything just right. So, no burnt edges or undercooked middles. Just moist, evenly baked cookie bars every time.
Let’s look at the stats that make these sheet pan cookies stand out:
| Prep Time | 10 minutes |
|---|---|
| Cook Time | 25 minutes |
| Total Time | 35 minutes |
| Servings | 24 cookie bars |
| Temperature | 350°F |
| Nutritional Info per Serving | 293 kcal, 41g carbs, 3g protein |
In conclusion, sheet pan cookies change the way we bake. They’re perfect for anyone wanting a quick, yummy treat without trouble. They capture the essence of convenient baking. Plus, every bite has that perfect cookie bar texture.
Nutritional Information for Health-Conscious Bakers
Exploring healthy baking means knowing the nutritional information of treats like peanut butter bars. These bars have unique peanut butter bar nutrition values. Knowing this is crucial whether you’re making them for a school event or enjoying them at home.
These days, peanut butter bars meet diverse dietary needs. They can be vegan, gluten-free, nut-free, and free from refined sugars. Ingredients include SunButter as a nut-free peanut butter alternative. Plus, rolled oats for fiber and coconut flour for its gluten-free benefits are used.
One bar from this special recipe has about 228 calories. It offers a good balance of macronutrients, perfect for tracking your food for energy and health.
| Nutrient | Amount per Serving |
|---|---|
| Calories | 228 |
| Carbohydrates (g) | 18.4 |
| Protein (g) | 6.5 |
| Fat (g) | 15.4 |
| Fiber (g) | 4.2 |
| Sugar (g) | 11.1 |
To lower the carb count, try using sugar-free syrups. Adding dark chocolate, especially between 70% to 85% cocoa, boosts flavor. It also adds antioxidants that help your heart and brain.
How you store these bars is also important. To keep their best taste and texture, eat them within a week from the fridge.
Knowing these facts helps you bake healthier. You can enjoy these tasty bars while sticking to your diet and health goals. Whether you’re adjusting the recipe for your needs or just want a healthier snack, these bars are both nutritious and satisfying.
Storing and Freezing Your Cookie Bars
After making Easy Peanut Butter Lunch Lady Cookie Bars, it’s important to keep them fresh. Whether you eat them right away or save them for later, storing them correctly is key.
How to Keep Your Cookie Bars Fresh
To keep your cookie bars fresh, don’t just throw them in any container. Here are steps to ensure they stay delicious:
- First, let the cookie bars cool completely after baking. Warm cookies stored away will generate moisture and result in sogginess.
- Place the bars in airtight containers to prevent air exposure, which can deteriorate their quality.
- For short-term storage, keep the container in a cool, dry place, and you can enjoy your peanut butter bars with maximum freshness for up to three days.
- If you plan to keep them for a little longer, refrigerating them might be a good option; stored this way, they can last up to one week.
Following these steps will help in maintaining freshness for when you crave a snack.
Freezing and Thawing Instructions
Freezing peanut butter bars can keep them fresh longer, great for surprises or planned snacks. Here’s how:
- Wrap each bar individually in plastic wrap. This preserves their flavor and texture while preventing freezer burn.
- Place the wrapped bars in a heavy-duty freezer bag or an airtight container.
- Be sure to label the container with the freezing date. Peanut butter bars can be frozen for up to two to three months.
- To thaw, leave them at room temperature for several hours or overnight in the refrigerator.
By storing correctly and understanding freezing tips, tasty snacks are always ready.
Remember, different recipes might freeze differently. It’s smart to test freeze a few before doing all your treats.
Sharing the Love: Peanut Butter Lunch Lady Cookie Bars for Every Occasion
Everyone loves peanut butter lunch lady cookie bars, right? They’re great as party treats. These bars are not just for looking back on good old days; they’re perfect for a bunch of events. Whether it’s a holiday party, a school function, or a weekend picnic, they make sharing easy.
From my own experiences, sharing cookie bars makes any event special. Seeing guests enjoy the taste of these chewy, peanut butter-filled bars is the best. On my blog, people tell me how these bars are a hit at their gatherings. This proves they’re a top pick for all kinds of events.
| Ingredient | Amount | Role in the Dessert |
|---|---|---|
| All-purpose Flour | 2 cups | Provides structure |
| Granulated Sugar | 1 cup | Sweetness & texture |
| Brown Sugar | 1 cup | Moisture & deeper flavor |
| Creamy Peanut Butter | 1 cup | Main flavor component |
| Unsalted Butter | 1 cup (2 sticks) | Fat content for tenderness |
| Semi-Sweet Chocolate Chips | 1 1/2 cups (optional) | Adds a rich, chocolaty twist |
The beauty of these cookie bars lies in their simple recipe. They’re ideal for parties or a treat at home. They’ll stay fresh for up to 5 days or can be frozen up to 3 months. This means you’re always ready with a yummy snack.
Think about making peanut butter lunch lady cookie bars for your next event. They’re tasty, satisfying, and top sharing cookie bars and party treats. They’re sure to shine on your dessert table!
Gearing Up for Baking: Tools and Equipment
In my baking journey, especially with perfect peanut butter lunch lady cookie bars, I’ve learned something important. Baking tools and equipment are key. The right tools make baking easier and improve your final product. They make every cookie bar consistently delicious.
Essential Baking Tools for Cookie Bars
If you’re starting with cookie bars, here are the must-have tools:
- A well-greased cookie sheet, essential for a non-stick baking experience
- Mixing bowls of various sizes for combining your ingredients
- Accurate measuring cups and spoons to ensure each ingredient is perfectly portioned
- A sturdy spatula for mixing and scraping the dough from the sides of the bowl
I want to share product recommendations that changed my baking game. The Wilton 101-Piece Cookie Cutter Set offers endless shape creativity, fun for families. The Norpro Grip-EZ 2-Tablespoon Stainless Scoop makes your cookie bars the same size for even baking.
Recommended Oven Settings
Oven settings for cookies must be precise. Don’t skip preheating your oven. It affects the texture and flatness of cookie bars. For peanut butter cookie bars, 350°F (177°C) is perfect. Use an oven thermometer to check internal temperature, as some ovens may vary.
The Sur La Table Stainless Steel Cooling Grid is great for cooling your cookie bars evenly. It’s safe in the oven up to 450°F, useful for many baking tasks.
To make magical treats, every baker needs the right tools. With these baking tools and equipment and cookie bar baking tips, you’ll wow anyone with your cookie bars, even the school cafeteria!
Making peanut butter lunch lady cookie bars is truly a special experience. It’s not just about taste. These treats also feed the soul. They take us back to the simple, happy times of school snacks.
In just about 40 minutes, you can enjoy these amazing bars. My kitchen is filled with the smell of sweet memories. This guarantees great baking results every time.
Each serving is a mix of delicious flavors. The creamy peanut butter and rich frosting are perfect together. They’re not just delicious but also make enough to share, with 459 kcal per serving.
The recipe is precise, from 1 cup of softened butter to 2 cups of quick oats. This careful measurement makes sure your cookie bars come out perfect.
The golden edges appear after just 15 minutes of baking at 350°F. Cutting them into 24 pieces brings back memories of school cafeteria treats.
These bars can stay fresh on your counter for a week or in the freezer longer. Trying these bars will show you the importance of precision and passion in baking. You’ll taste a piece of history too.
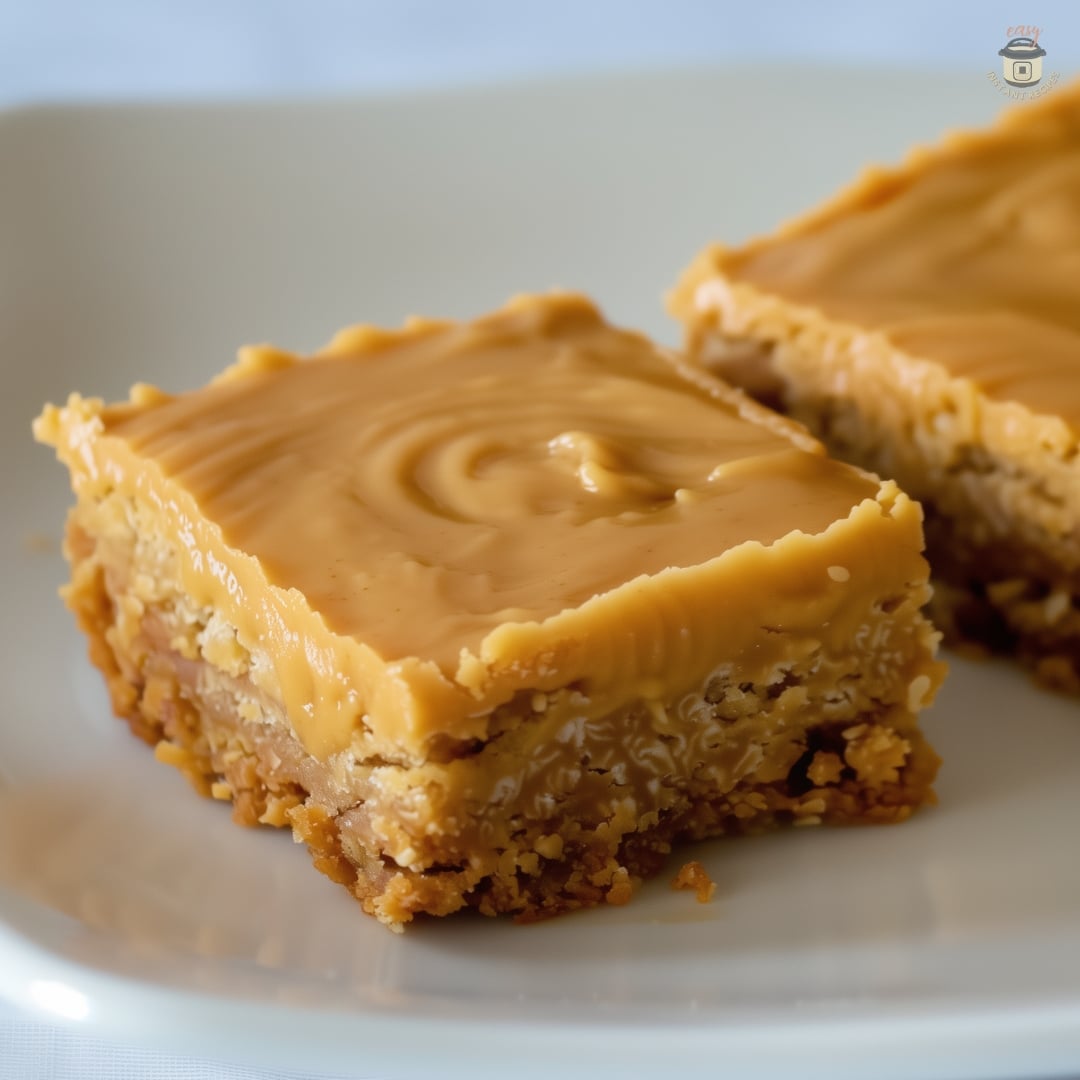
Peanut Butter Lunch Lady Cookie Bars Recipe
16
bars15
minutes25
minutes420
kcal40
minutesPeanut Butter Lunch Lady Cookie Bars are soft, chewy peanut butter cookie bars topped with a smooth vanilla frosting. This classic school cafeteria dessert uses simple pantry ingredients and bakes in one pan, making it an easy crowd-pleasing treat for potlucks, bake sales, holidays, or family gatherings.
Ingredients
- Base
2 cups 2 2 cups all-purpose flour
2 cups 2 2 cups granulated sugar
1½ cups 1½ 1½ cups creamy peanut butter
1 tsp 1 baking soda
1 tsp 1 salt
1 tsp 1 vanilla extract
2 2 large eggs
½ cup ½ milk
1½ cups 1½ (3 sticks) unsalted butter, melted
- Frosting
4 cups 4 powdered sugar
½ cup ½ milk
1 tsp 1 vanilla extract
Directions
- Heat oven to 375°F. Grease a 9×13 pan.
- Mix melted butter, sugar, and peanut butter until smooth.
- Add eggs, milk, and vanilla. Mix well.
- Stir in flour, baking soda, and salt.
- Spread batter evenly in pan.
- Bake 20–25 minutes until set. Cool slightly.
- Whisk frosting ingredients until smooth.
- Spread frosting over warm bars. Cool, slice, and serve.
Notes
- • Classic school lunchroom dessert
• Soft, chewy peanut butter cookie bars
• Creamy vanilla frosting on top
• One-pan recipe
• Uses pantry staples
• Great for parties and bake sales
• Easy to slice and serve
FAQ
What is the best type of peanut butter to use in the cookie bars?
Creamy peanut butter works best for smooth, rich cookie bars. If you like a bit of crunch, chunky peanut butter is good too.
Can I use natural peanut butter in this recipe?
Yes, you can use natural peanut butter. Just stir it well first because the oil separates, which might change the texture a bit.
Do I need to sift the flour for the peanut butter cookie bars?
Sifting flour is not required. But, it helps remove lumps and aerates the flour.
Can I substitute almond milk for regular milk in the recipe?
Absolutely! Feel free to use almond milk or any non-dairy milk.
How do I know when my peanut butter cookie bars are done baking?
Look for lightly golden edges and a set center. Insert a toothpick in the center; it should come out clean or with some crumbs. Don’t overbake to keep them chewy.
What can I add to the cookie bars for a chocolate twist?
To add a chocolate twist, mix in chocolate buttercream or chocolate chips.
Are there any alternatives to peanut butter I can use?
Yes. If you have nut allergies or prefer something else, try sunflower seed butter or alternative nut butters like almond or cashew.
What is the secret to getting the perfect texture on my cookie bars?
Don’t overmix the batter and avoid overbaking. For chewiness, let them cool completely before cutting into bars.
How can I make the frosting for my cookie bars extra smooth?
Use room temperature butter, beat it well, and slowly add powdered sugar for creamy frosting.
Why are sheet pan cookies a convenient option?
Sheet pan cookies are quick and easy to make in big amounts. They bake evenly too.
How can I adjust this recipe to be more health-conscious?
Use whole wheat flour, less sugar, and applesauce instead of butter for a healthier version.
What’s the best way to keep my peanut butter cookie bars fresh?
Keep them in an airtight container at room temperature. You can also refrigerate or freeze for longer storage.
Can I freeze the cookie bars, and if so, how do I thaw them?
Yes, you can freeze them. For thawing, leave them out at room temperature for a few hours or overnight.
Are these cookie bars suitable for large gatherings?
Absolutely! They’re perfect for feeding a crowd at school events, parties, or any large gathering.
What essentials do I need for baking peanut butter lunch lady cookie bars?
You need a greased cookie sheet, mixing bowls, an electric mixer or whisk, measuring tools, and a spatula.
At what oven temperature should I bake the cookie bars?
Preheat your oven to 350°F (175°C) for the best baking results.