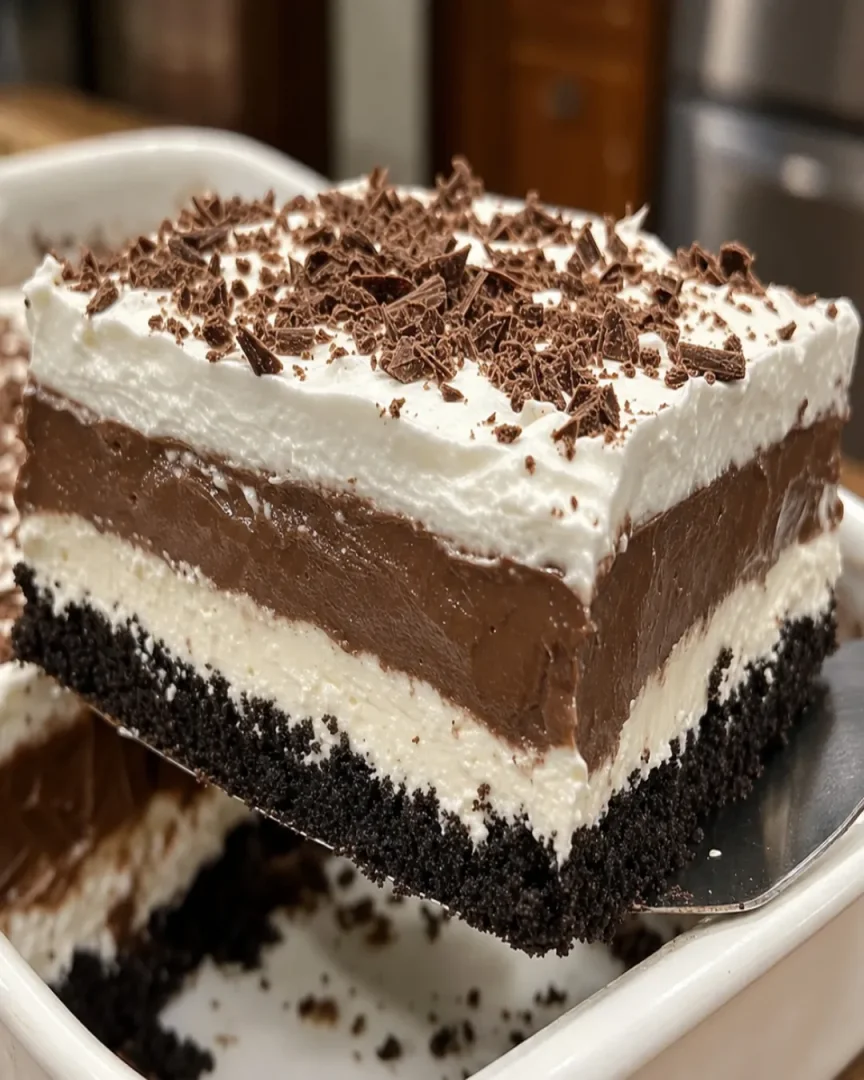
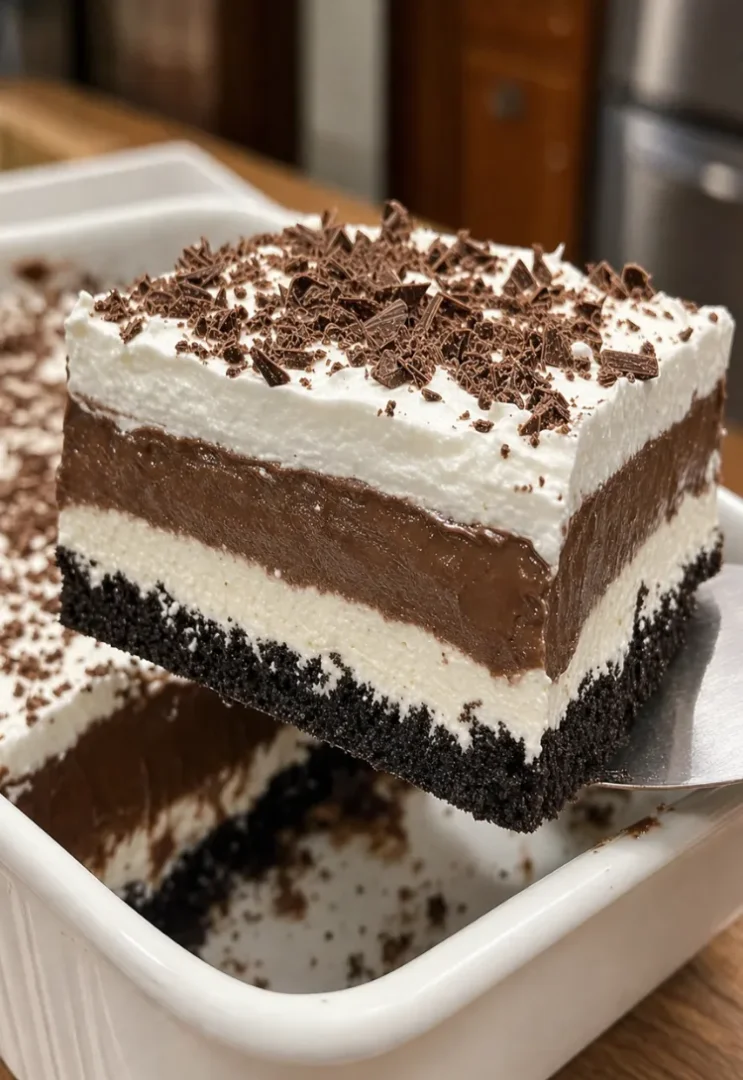
Four distinct layers of dessert perfection: a crushed Oreo crust, a fluffy cream cheese layer, rich chocolate pudding, and a topping of whipped cream and chocolate chips. This no-bake chocolate lasagna is the ultimate crowd-pleasing dessert that looks impressive but requires zero oven time.
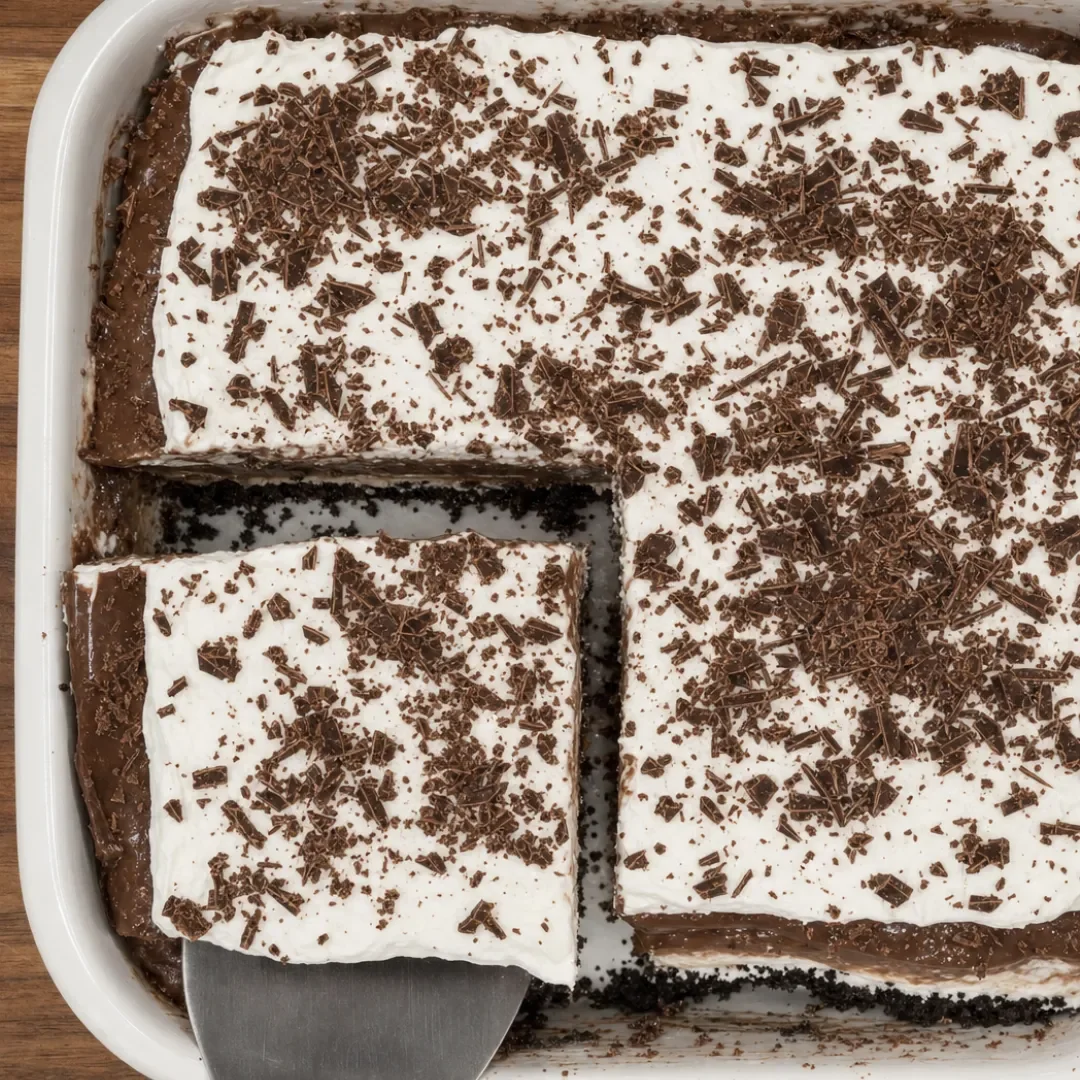
If there is one dessert that is guaranteed to cause a stampede at a potluck, it is Chocolate Lasagna. Despite the savory name, there is no pasta or tomato sauce to be found here—just layer upon layer of sweet, creamy, chocolatey goodness. It is the kind of dessert that makes people audibly gasp when you slice into it and reveal those perfect, distinct strata.
My personal history with this recipe goes back to the summer of 2019. It was July, the air conditioner in my apartment had decided to quit, and I had promised to bring dessert to a neighborhood block party. Turning on the oven was absolutely out of the question. I remembered seeing a viral video for a layered “lasagna” dessert and decided to give it a try. I crushed a family-sized pack of Oreos, whipped up some cream cheese, and layered it with instant pudding.
Let me tell you, it was a revelation. Not only did I not sweat to death in my kitchen, but that dessert disappeared faster than anything else on the table. My neighbor, Mr. Henderson, actually tracked me down to make sure I had written the recipe down for his wife.
However, I must confess that my second attempt was a bit of a disaster. I was in a rush and didn’t let the cream cheese layer set properly before pouring the pudding over it. When I sliced into it, the layers completely collapsed into a murky, brown-and-white swamp. It still tasted good, but it looked terrible! I learned my lesson: patience is the secret ingredient in this recipe. Giving each layer time to chill and firm up in the refrigerator is what creates those beautiful, clean lines when you cut into it.
Chocolate Lasagna is one of those no-bake desserts that sounds simple and somehow still impresses everyone at the table. Four layers — Oreo crust, cream cheese filling, chocolate pudding, whipped topping — and every bite hits a different texture. Crunchy, creamy, soft, fluffy. That contrast is why people go back for a second square even when they said they were done.
It’s been a potluck staple for decades and it earns it. You can make it the night before, it travels well chilled, it feeds a crowd, and the ingredients are all grocery store basics. No baking. No candy thermometer. No technique that requires practice. Just layers built in order and a night in the fridge.

The Oreo crust
Crush the cookies as finely as you can. Large chunks make the crust crumble when you slice it and the edges fall apart, which ruins the layered look that’s the whole point of this dessert. A food processor gets you the finest crumb. A zip-lock bag and a rolling pin work too—just keep going until the crumbs are consistent throughout.
Mix the crumbs with melted butter, press them firmly into the bottom of a 9×13 pan, and refrigerate for at least 15 minutes before adding anything. Use the bottom of a measuring cup to compress the crust flat and even—a loose crust is the most common reason slices fall apart.
Add a pinch of salt to the crust. It sharpens the chocolate flavor, and you won’t taste the salt itself.
The cream cheese layer
The cream cheese needs to be soft before you start—leave it on the counter for 30 minutes. Cold cream cheese doesn’t blend smoothly no matter how long you beat it, and the lumps show up clearly in the white layer when the dessert is sliced.
Beat the cream cheese and powdered sugar together fully before the whipped topping goes in. That order creates a smoother, lighter base. Fold the whipped topping in gently—don’t stir it in hard or you’ll knock the air out and the layer gets dense. Spread it over the chilled crust with an offset spatula, lightly, without pressing into the crust underneath.
The chocolate pudding layer
Instant pudding and cold milk are whisked until just smooth and thickened—then onto the cream cheese layer immediately. Don’t over-whisk. Instant pudding sets fast, and if you keep going past smooth, it starts to get lumpy. Whisk until there are no dry pockets, then spread it right away before it firms up in the bowl.
Whole milk gives you thicker, richer pudding than low-fat. If you care about the layers staying defined, thicker pudding is easier to spread without it bleeding into the cream cheese below.
Getting clean slices
Refrigerate overnight. A few hours gets you there, but the difference between slicing at 4 hours and slicing at 12 hours is real—the crust softens slightly, the flavors come together, and the pudding sets completely. It’s worth the wait.
Before slicing, put the pan in the freezer for 20 minutes. Just firmer, not frozen. Then run a sharp knife under hot water, wipe it dry, and cut. Wipe between each slice. That’s what keeps the layers from smearing into each other at the edges.
The topping
Spread whipped topping over the pudding in an even layer and finish with something on top—chocolate shavings, crushed Oreos, mini chocolate chips. To make chocolate curls, drag a vegetable peeler along the side of a room-temperature chocolate bar. It takes 30 seconds and looks significantly better than leaving the top plain.
Variations
The pudding layer is the easiest thing to swap. Chocolate fudge pudding gives a deeper flavor. Cookies and cream pudding doubles the Oreo presence. Peanut butter pudding with the Oreo crust is a different dessert entirely — a good one. Mini chocolate chips folded into the cream cheese layer add texture without changing much else.
Storing it
Covered in the fridge for up to 4 days. The crust softens as it sits and by day two the whole thing is a bit more cohesive — less crunch, more of everything blending into one bite. Some people prefer it that way. Either version is good depending on what you’re after.
It freezes — wrap tightly or cut into individual squares and freeze in a zip-lock bag. Thaw overnight in the fridge. The texture changes slightly but it holds up.
How to Make Chocolate Lasagna
This dessert is all about the layers. Start by crushing your Oreos into fine crumbs. You can do this in a food processor, or put them in a large zip-top bag and bash them with a rolling pin (highly therapeutic). Mix the crumbs with melted butter and press them firmly into the bottom of a 9×13 inch baking dish. Put the dish in the fridge to let the crust set while you make the next layer.
For the cream cheese layer, use a hand mixer to beat the softened cream cheese until smooth. Add powdered sugar and a splash of vanilla, then gently fold in half of your whipped topping. Spread this mixture evenly over the chilled Oreo crust. Put the dish back in the fridge for at least 15 minutes. This chilling step is crucial—if you skip it, the pudding will mix with the cream cheese.
Next, whisk together the instant chocolate pudding mix and cold milk. The mixture will start to thicken almost immediately. Pour it over the chilled cream cheese layer and spread it smooth. Back into the fridge it goes, this time for about 10 minutes, just to let the pudding set up slightly.
Finally, spread the remaining whipped topping over the pudding layer. Garnish generously with mini chocolate chips or more crushed Oreos. Cover the dish and refrigerate for at least 4 hours, or ideally overnight. This resting time allows the layers to firm up completely so you get those beautiful, clean slices.
Frequently Asked Questions
Can I make Chocolate Lasagna ahead of time?
Yes, this is the perfect make-ahead dessert! In fact, it needs to chill for at least 4 hours before serving, and it is even better if made a full 24 hours in advance. The layers firm up beautifully, making it much easier to slice.
Can I freeze Chocolate Lasagna?
Yes, it freezes very well. Wrap the dish tightly in a double layer of plastic wrap and freeze for up to a month. Let it thaw in the refrigerator overnight before serving. Some people even prefer eating it partially frozen, like an ice cream cake!
What if I don’t want to use Cool Whip?
You can substitute fresh whipped cream. You will need to whip about 3 cups of heavy whipping cream with 1/2 cup of powdered sugar and 1 teaspoon of vanilla until stiff peaks form. However, keep in mind that fresh whipped cream is less stable and may begin to weep after a day or two in the fridge.
Let’s Get Layering!
If you try this No-Bake Chocolate Lasagna, please leave a rating and let me know how it turned out in the comments below! Don’t forget to share a photo on Facebook and tag my page so I can see your beautiful layers.
Reader Testimonials:
“I made this for a family reunion, and it was the first dessert to disappear. The layers look so professional, but it was so easy to make!” — Sarah from Michigan
“My kids request this for their birthdays instead of traditional cake now. The tip about chilling between layers is spot on.” — Michael from California
“I took this to a summer BBQ and had three different people ask for the recipe. It’s perfectly sweet without being heavy.” — Linda from Texas
Easy Chocolate Lasagna
A no-bake dessert that layers rich chocolate flavors with creamy textures, making it the perfect indulgence for any chocolate lover.
Ingredients
- 36 Oreo cookies, crushed
- 6 tbsp butter, melted
- 8 oz cream cheese, softened
- ¼ cup sugar
- 2 boxes (3.9 oz each) instant chocolate pudding
- 3 cups cold milk
- 16 oz whipped topping, divided
- Chocolate shavings or crushed Oreos for topping
Directions
Mix crushed Oreos with melted butter. This combination creates a deliciously rich crust that forms the base of your lasagna. The melted butter helps the crumbs bind together, ensuring a sturdy foundation. Take care to incorporate all crumbs so that every bite of the crust is equally flavorful.
Press into a 9x13-inch dish and chill for 10 minutes. Chilling helps the crust firm up before adding more layers, making it easier to work with. A slight chill also prevents the crust from becoming too soft when the layers are added. A firm crust will give you a better slice.
Beat cream cheese and sugar until smooth. It's important to get rid of any lumps for a creamy filling; a hand mixer is ideal for this. Take your time to make the mixture velvety. Ensure that the cream cheese is truly at room temperature for the best results.
Fold in 1½ cups whipped topping. This adds lightness to the cream cheese mixture, making it fluffy. Be gentle when folding to maintain the airy texture you desire. This step is crucial for achieving that light, creamy filling that will contrast beautifully with the dense pudding layer.
Spread over crust carefully. Use a spatula to smooth it out, ensuring even coverage. This layer should be thick enough to hold its shape but not too overwhelming; it needs to balance the other layers perfectly.
Whisk pudding mix with cold milk until thick. This step is essential for achieving that rich pudding layer. Follow the instructions on the pudding box, ensuring it sets to the right consistency. Be sure to whisk vigorously for a smooth pudding without lumps.
Spread pudding layer over cream cheese mixture. Again, take your time to ensure an even layer. This will create a beautiful contrast against the cream cheese layer below. A careful spread will help keep the layers distinct.
Top with remaining whipped topping. This creates a light, airy finish on your dessert. Feel free to create swirls or peaks for an added touch of elegance. Don’t hesitate to be creative with this step, as the topping is the finishing touch that can elevate the appearance.
Sprinkle chocolate shavings or crushed Oreos on top. This adds a nice decorative touch and extra flavor; consider using a microplane for fine shavings or simply crush Oreos in a zip-top bag for a coarser topping. A mix of both can add texture and visual interest.
Chill for at least 4 hours before slicing. This is where the magic happens as the layers set perfectly. The longer it chills, the more deliciously integrated the flavors become. This time allows for the ultimate flavor melding, ensuring that every slice is as delightful as the last.